Tutorial:Turning Props Into Plops/6
Jump to navigation
Jump to search
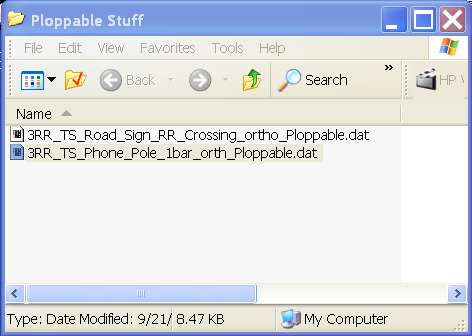
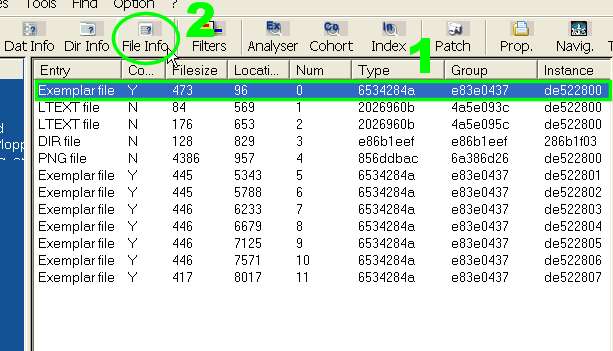
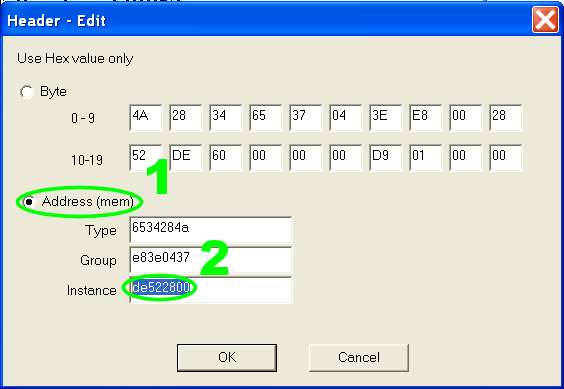
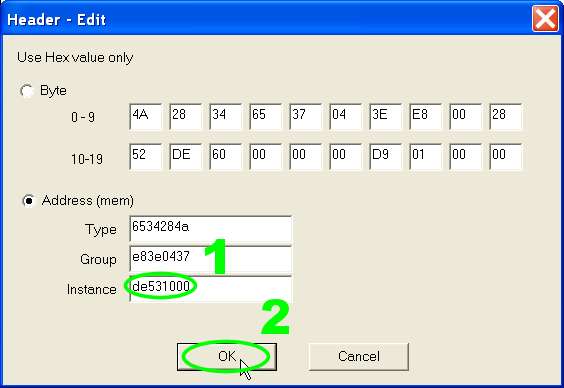
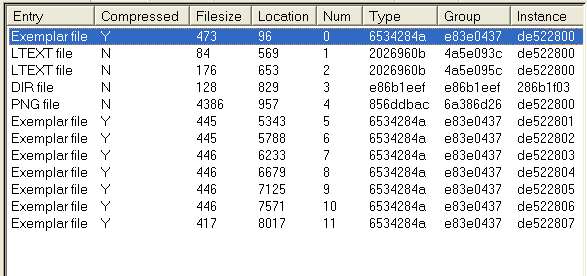
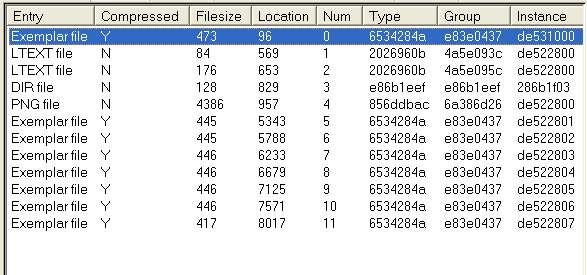
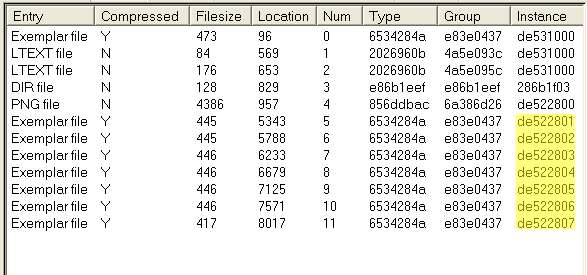
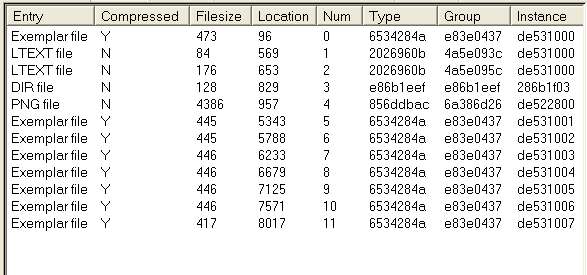
[quote author=dedgren link=topic=112.msg182367#msg182367 date=1222028494]
[font=Verdana][size=9pt][size=13pt][b]Turning a prop into a plop - A tutorial (Part Six)[/b][/size]

This is the sixth part of the 3RR Plopperizer™ tutorial.  [url=http://sc4devotion.com/forums/index.php?topic=112.msg181757#msg181757][font=Verdana][size=9pt]Part One is here [[color=green]linkie[/color]][/size][/font][/url], [url=http://sc4devotion.com/forums/index.php?topic=112.msg181906#msg181906][font=Verdana][size=9pt]Part Two is here [[color=green]linkie[/color]][/size][/font][/url], [url=http://sc4devotion.com/forums/index.php?topic=112.msg181998#msg181998][font=Verdana][size=9pt]Part Three is here [[color=green]linkie[/color]][/size][/font][/url], [url=http://sc4devotion.com/forums/index.php?topic=112.msg182091#msg182091][font=Verdana][size=9pt]Part Four is here [[color=green]linkie[/color]][/size][/font][/url] and [url=http://sc4devotion.com/forums/index.php?topic=112.msg182272#msg182272][font=Verdana][size=9pt]Part Five is here [[color=green]linkie[/color]][/size][/font][/url].

Having saved our new ploppable telephone pole .dat file

[size=7pt][i]Fig. 31[/i][/size]
[img]http://img444.imageshack.us/img444/2089/fig31rk7.png[/img]

we move on to the next step.

2)  [b]Edit the instance numbers of the exemplar and LTEXT files in the directory list pane[/b].  Now we start getting down to it.  We're going to edit the following instance numbers.

[size=7pt][i]Fig. 32[/i][/size]
[img]http://img146.imageshack.us/img146/116/fig32qg6.png[/img]

The DIR file does not change.  We'll be deleting the PNG file and replacing it with a new one, so we don't need to bother with it.

We'll start by (1) left-clicking on the topmost exemplar file in the directory list pane to highlight it, then (2) left click on the task bar's "File Info" button.

[size=7pt][i]Fig. 33[/i][/size]
[img]http://img263.imageshack.us/img263/5186/fig33rq1.png[/img]

This brings up the "File Info" dialog window, where you'll left-mouse click on the big "Edit" button.

[size=7pt][i]Fig. 34[/i][/size]
[img]http://img502.imageshack.us/img502/4027/fig34bt3.png[/img]

This in turn brings up the "Header - Edit" dialog window.  You'll want to (1) make sure the "Address (mem)" radio button is selected, then you'll (2) select and edit the "Instance" text entry field.

[size=7pt][i]Fig. 35[/i][/size]
[img]http://img301.imageshack.us/img301/8466/fig35ka6.png[/img]

In the "Instance" text field, (1) type [font=Courier New]de531000[/font] and (2) left click on the "OK" button to input the change.

[size=7pt][i]Fig. 36[/i][/size]
[img]http://img218.imageshack.us/img218/5296/fig36dc7.png[/img]

Now- [b]important aside[/b]- why did you just type in "de531000"?  Oh, sure, because I told you to, but stop and think about it a minute.  This number will be the base hexadecimal address (the instance part, but the type and group numbers stayed the same, remember?) for our new ploppable telephone pole .dat file.  Now, do you want to use that same base number if you later on do a ploppable BAT object of your own?  Of course not.  This is where you start with your own brand new one-in-four-billion hexadecimal instance number.  OK?  I'm glad we've had this chat...

So, now you're about to discover an irritating quirk of the Reader.  When you clicked "OK" a few seconds ago, the "File Info" dialog box returns, ready for another go round.  When you look at the directory list pane though, it still has the old instance number: "de522800".  It should update, but it doesn't.

[size=7pt][i]Fig. 37[/i][/size]
[img]http://img228.imageshack.us/img228/6873/fig37bd4.png[/img]

Well, some things you just have to do manually.  Click on the file, and there it is: "de531000".

[size=7pt][i]Fig. 38[/i][/size]
[img]http://img524.imageshack.us/img524/6214/fig38iz5.png[/img]

Now we get to the place where I have to trust you've been paying attention (which, of course, I know you have).  We need to change the two LTEXT file instance numbers and change them to "de531000" as well.

[size=7pt][i]Fig. 39[/i][/size]
[img]http://img502.imageshack.us/img502/5550/fig39ju4.png[/img]

If we take this step-by-step, we will never get to the end of this already very long tutorial.  What I'd like you to do is head back up this post to Figure 34 and, highlighting each LTEXT file in turn, go through the steps to change each of their instance numbers to "de531000".  When you're done, your directory list pane will look like this.

[size=7pt][i]Fig. 40[/i][/size]
[img]http://img228.imageshack.us/img228/7668/fig40pk7.png[/img]

Having passed that hurdle, we now are confronted with a similar situation with regard to the remainder of the exemplar files.  We'll be changing the instance numbers for each of them.

[size=7pt][i]Fig. 41[/i][/size]
[img]http://img223.imageshack.us/img223/866/fig41rb6.png[/img]

You can see an important difference, though.  Each of these seven exemplar file instance numbers increment by 1 the base instance number; thus "de522801" changes to "de531001", "de522802" to"de531002", "de522803" to "de531003", "de522804" to "de531004", "de522805" to "de531005", "de522806" to "de531006", and "de522807" to "de531007".  No matter what instance number you would choose for your own plop creations, these exemplars must end in 1 through 7 in sequence.  So, head back to Figure 34 again, and change each of the instance numbers as described.  Here's how your directory list pane will wind up.

[size=7pt][i]Fig. 42[/i][/size]
[img]http://img218.imageshack.us/img218/9471/fig42sq6.png[/img]

When you get to this point, you've edited in all the new file instance numbers in the directory list pane.  That's a good point to take a break. so we'll see you back in [url=http://sc4devotion.com/forums/index.php?topic=112.msg182436#msg182436][font=Verdana][size=9pt]Part Seven of the tutorial, which is here [[color=green]linkie[/color]][/size][/font][/url].


David

[size=6pt]133243[/size][/size][/font]
[/quote]