Tutorial:Calibrating Photoshop
|
|
This article is a tutorial It was originally written by BarbyW, and retrieved from SimCity 4 Devotion. This tutorial has been automatically protected because it is considered to be finished. You can suggest changes in the Tutorial Requests and Suggestions article. |
The aim of this document is to explain the process of colour correction from photoshop to SC4. It will show you one of the many procedures that can be applied to fix this problem and give more predictable rendering outputs.
Requirements and notes about this article
You will need a copy of photoshop 4.0 or greater and preferably two non-colour-blind eyeballs, attached to a small to medium-sized brain. The details shown in this article are specific to photoshop CS, however, as little has changed in the numerous upgrades to this version, (with the exception of the useless "leopard-skin brush" and the "automatic wedding invitation template button"), most of the info should apply to earlier versions.
I am going to explain the calibration process in detail so you can see some of the more powerful aspects of photoshop and use them in other situations. Some words and concepts have specific meanings in photoshop and will be accordingly defined. Don't be scared of this, you already speak "gmax".
The wonderful world of colour
We all know the problem. You make a texture in photoshop, render it to SC4 and it doesn't look like your original texture. The reason for this is that photoshop and gmax are effectively working in different colour spaces.
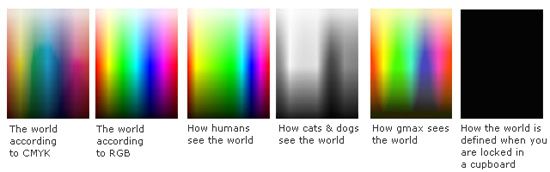
For the purpose of this exercise, colour space is a term used to show how colour, is described or modelled. The easiest colour model to understand is CMYK. (C)Cyan, (M)Magenta, (Y)Yellow and (K)Black and is used to describe the colour of light-reflecting objects such as squirrels, chairs or paintings, and is widely used in printing. It's like mixing paint in a primary school art class: mix 50% Cyan to 50% yellow and you get green.
RGB is the most difficult colour model to understand and is used in light-emitting devices such as monitors, gmax and in the dubious lighting effects of 1970s discotheques. Colour is defined as having (R)red, (G)green and (B)Blue components or channels. Its like having three coloured spot-lights shining onto a surface. If you shine all three at once you will get white, turn them all off and you will black. Shine only the red and green lights and you will get yellow.
A channel in photoshop is used to describe each of the colour components that make a colour space. ie: the red channel is said to be a component of the RGB colour model.
http://i5.photobucket.com/albums/y171/barbyw/GC%20Calibrate/image001.jpg
Under no circumstances ever use the CMYK colour space in making your textures - they are intended to be seen on RGB monitors playing RGB SC4. Ever wondered why your RGB digital photos come out the wrong colour when you print them to your CMYK inkjet printer?
Calibrating your eyeballs
Before you even think of doing anything related to this article, you need to make sure your photoshop is calibrated and set up correctly. You should only ever have to do these things once in your life:
1. Ideally you should have run the Adobe gamma set- up program which starts up when you first install photoshop, so both your eyeballs and the lighting conditions of the room you are working in are taken into account. (See Adobe's help files on this issue)
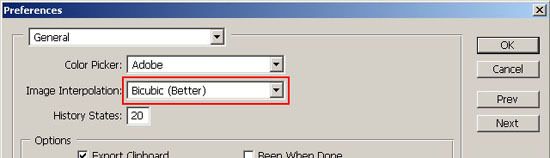
2. Make sure image interpolation is set correctly in the photoshop preferences (CTRL-K) to bicubic(Better). Sometimes low-level re-sampling can adjust colours.
http://i5.photobucket.com/albums/y171/barbyw/GC%20Calibrate/image002.jpg
3. Obviously, make sure any textures or new documents you are working on are in RGB format!
Finding the gmax colour shift
Create a new photoshop document:
http://i5.photobucket.com/albums/y171/barbyw/GC%20Calibrate/image003.jpg
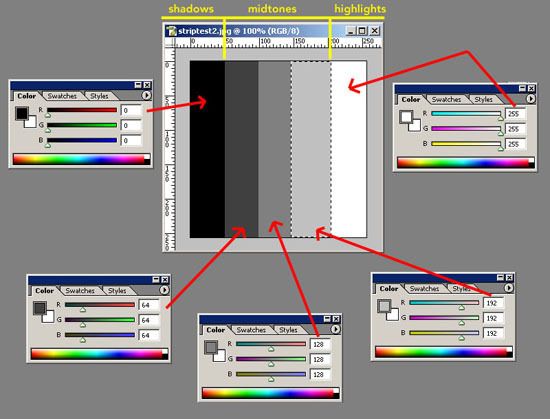
We are going to create a "control" texture which consists of 5 RGB "grey" or neutral strips. The colour of each strip is very important and must be entered numerically in the colour pallette or colour picker. Use the marque tool to draw the rectangles, set the colour you need, then hit good-old SHIFT-F5 (or choose FILL from the edit menu) to fill the selected areas to end up with the texture below.
You should note that the "lighter" the colour, the higher the RGB values; 0 0 0 is black, 255 255 255 is white.
Also note that Photoshop describes tones, that is, how light or dark a colour is, in terms of shadows, midtones and highlites. These terms are used throughout the program in various adjustment functions.
Neutral is a specific photoshop term used to desribe a colour whose individual components are set at equal or nearly equal values and does not neccessarily mean grey.
http://i5.photobucket.com/albums/y171/barbyw/GC%20Calibrate/image004.jpg
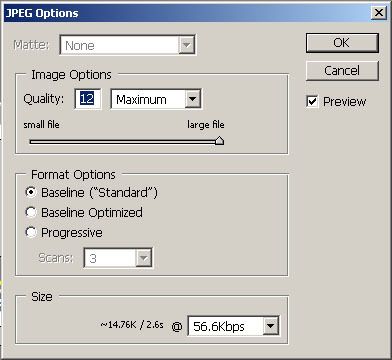
Save the texture as a JPEG with the following settings. It is important that quality is set to maximum as no colour distortion will occur at JPEG setting 12.
http://i5.photobucket.com/albums/y171/barbyw/GC%20Calibrate/image005.jpg
Now import the texture into gmax, make a large cube and apply the texture with a UVW map. Using the gmax preview function, render a view of the cube at HIGH quality to the screen. (South is my personal favourite).Take a screenshot.
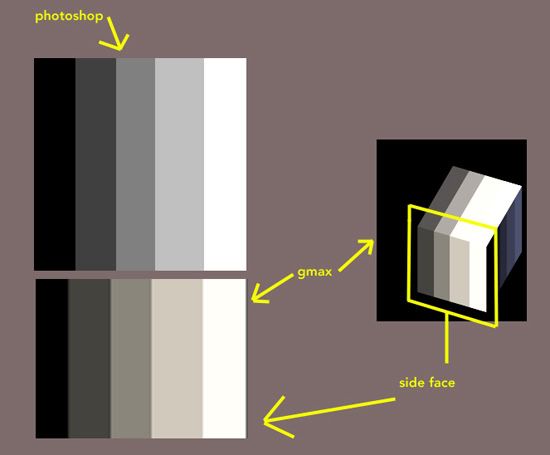
Go back into photoshop and paste the screenshot into a new document. (you may want to use a coloured neutral background so you can easily see the colours). Delete all of surrounding screenshot mess as we are only interested in the side face of the model. Drag your texture file into this document as well.
Make a rough selection of the model's side face to include all of the strip texture including the black bit. Copy it to a new layer (CTRL-J), scale it up (CTRL-T) and place it near your original photoshop texture, so you end up with the following:
http://i5.photobucket.com/albums/y171/barbyw/GC%20Calibrate/image006.jpg
Oh dear. What a disaster. You can now see the colour shift. (if not please consult your nearest optician). Contrary to popular belief, the gmax colours are not just "lighter": t hey have been mapped to a different colour space.
I can tell you from experience, using only my highly skilled eyeballs, that there is roughly a 10% shift towards yellow, an increase in luminosity (lightness) and a general saturation (colours moving further apart in the midtones).This offset effect increases towards the highlights and midtones, but effects the shadows less. You should in the very least notice it is lighter and more yellow.
You now have two options: You can note this in your head and remember to make your textures, darker, less yellow and more desaturated. Point proven, end of story.
Or you can take this issue further and get the problem fixed once and for all.
Fixing the gmax colour shift
You will now need a pen and some paper because we are going to take some accurate colour readings with the most under-rated photoshop tool of all: The Eyedropper and his faithful friend The Info Pallette. We are going to fix the colour shift so that textures apearing on the front face view of a SC4 model will match their photoshop originals. The shaded and roof parts will dealt with in another document.
http://i5.photobucket.com/albums/y171/barbyw/GC%20Calibrate/image007.jpg
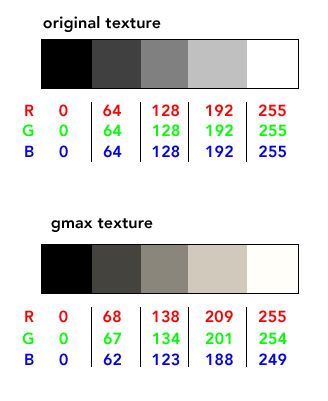
Now, we already know what the RGB colour values of our original texture are, as we chose them. All we need to do now is use the eyedropper to read the values of the gmax texture.
Record all of the five RGB values on paper, by holding the eyedropper over each colour. The RGB value will appear in the info pallete as shown above. The following tables show how the colours have changed in my gmax:
http://i5.photobucket.com/albums/y171/barbyw/GC%20Calibrate/image008.jpg
As you can see from the numbers, if gmax was rendering the textures only "lighter", then they would have all increased proportionally by the same amount. They do not. The darker colours have altered by less. Look at the black - it's unchanged. The midtones have altered most, and the white only slightly. And on top of this, the red and green components have increased in value and the blue component has decreased! "Oh my God, how ever I am gonna fix that, the values are all over the place!" I hear you cry.....
Welcome to Photoshop Curves
Fortunately, this is all a piece of cake for photoshop. What we are going to do now is create a mapping curve so photoshop "knows" what gmax is doing to its colours. The principle behind this is that we are going to work in reverse, ie; apply a set of changes to the gmax texture to get it back to the photoshop texture. We will then be the proud owners of a set of offset values. We can then apply these to all of our textures, let gmax ruin them by the offset value and end up with what we wanted, because photoshop pre-empted it.
There are, as usual with photoshop, hundreds of ways to do this. All of the colour / mapping functions are found in the IMAGE > ADJUSTMENTS sub menu. They virtually all do the same thing in different ways. Curves are most appropriate for our current situation.
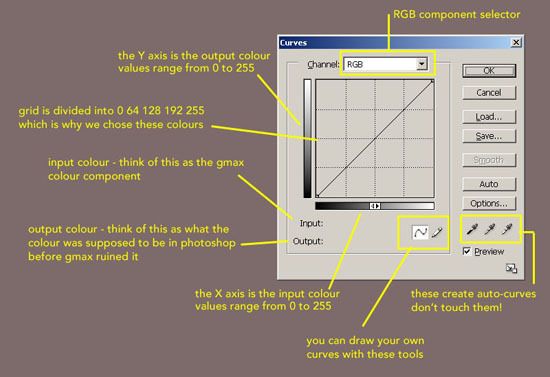
In your photoshop sketchpad document containing the gmax and photoshop textures next to each other, use the rectangular marquee tool to roughly select all of the gmax texture image you scaled up. Then, open a new curves window. (CTRL-M). This is what a curves window looks like:
http://i5.photobucket.com/albums/y171/barbyw/GC%20Calibrate/image009.jpg
We are now going to add in our values from the colour readings we took to the input and output boxes to create a curve.
http://i5.photobucket.com/albums/y171/barbyw/GC%20Calibrate/image010.jpg
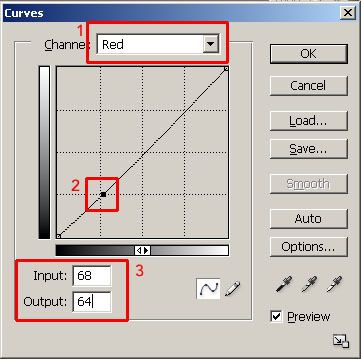
1. Firstly we are going to adjust all of the red components of the RGB colour space. Select this from the pull-down menu. Make sure that "RGB" is not selected (the default) or you will be working on all channels similtaneously!
Using the colour readings table we created we are going to map the red components: 0 to 0, 68 to 64, 138 to 128, 209 to 192 and 255 to 255
The first colour in our strip (black), requires no adjustment. (0 to 0)
2. The second colour (dark grey) does. Add a point to the curve by clicking on it roughly on the dotted grid point.
3. In the input box, type in the value of the gmax red component for this strip: 68. In the output box type in the colour it is supposed to be: 64.
Translated into English, we are saying to photoshop "the gmax red colour component of value 68 should be 64"
http://i5.photobucket.com/albums/y171/barbyw/GC%20Calibrate/image011.jpg
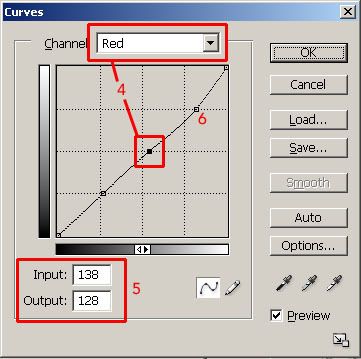
Now onto the next strip: the mid grey...
4. Still working in the red channel, add another point on the curve for the medium grey strip colour.
5.In the input box, enter the gmax colour reading 138 and in the output box enter the value it was supposed to be before gmax ruined it: 128.
6. Repeat this until all the red components have been mapped and you will end up with a red component or channel curve like shown.
Translated into English, we are saying to photoshop "the gmax red colour component of value 68 should be 64, the gmax red colour component of value 138 should be 128, and the gmax red colour component of value of 209 should be 192"
http://i5.photobucket.com/albums/y171/barbyw/GC%20Calibrate/image012.jpg
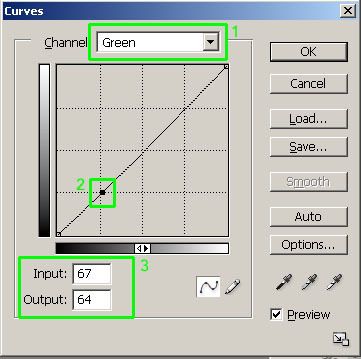
Now we need to move onto the green channel.
1.Select the green channel from the pull-down menu.
Using the colour readings table we created we are going to map the green components: 0 to 0, 67 to 64, 134 to 128, 201 to 192 and 255 to 255
The first colour in our strip (black), requires no adjustment. (0 to 0)
2. The second colour (dark grey) does. Add a point to the curve by clicking on it roughly on the dotted grid point.
3. In the input box, type in the value of the gmax green component for this strip: 67. In the output box type in the colour it is supposed to be: 64.
Translated into English, we are saying to photoshop "the gmax green colour component of value 67 should be 64"
Repeat steps 2 and 3 until all the colours of each strip have been mapped to create the green channel curve.
http://i5.photobucket.com/albums/y171/barbyw/GC%20Calibrate/image013.jpg
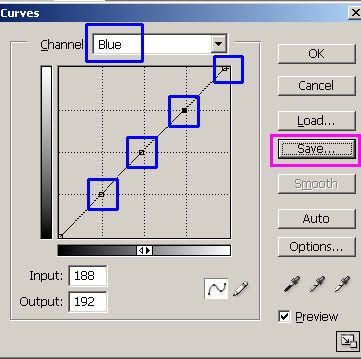
Now you should be getting the hang of this. It may seem tedious but once we have finished you will never have to do this again.
1.Select the blue channel from the pull-down menu.
Using the colour readings table we created map the blue components: 0 to 0, 62 to 64, 123 to 128, 188 to 192 and 249 to 255
When you are finished save the curves as a .acv file somewhere convient on your computer.
If you did all of this while your gmax texture enlargement was selected you should have witnessed the colours returning to very near their original intention. Take colour readings with the eyedropper to prove this.
You are now the proud owner of a very important .acv file!
Testing and using your .acv file
Now that you have created your special gmax colour shift file it can be re-called and applied to all textures that you wish to display correctly on your SC4 models. To test this, open your original strip texture file used in gmax.
Open a new curves window (CTRL-M). Press the load button and locate your .acv file to import your curves.
Hit OK to apply the colour shift. You should notice that photoshop moves your colours by the offset values to pre-empt gmax. They will move towards blue (opposite of yellow) and get darker.
Save your strip texture as a JPEG - maximum quality or setting 12.
Now re-import the texture into gmax, and render your model to screen.Take a screenshot.
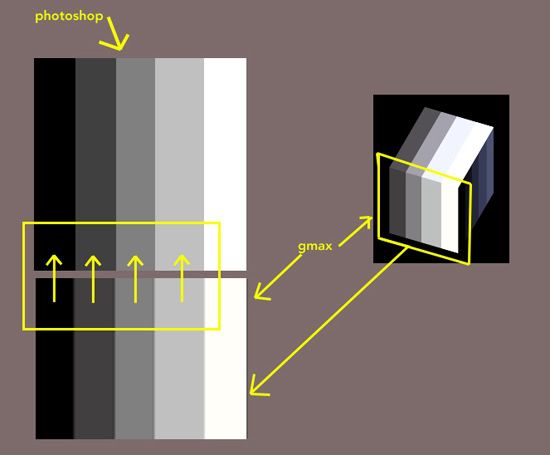
Go back into photoshop and paste the screenshot into your photoshop sketchpad document and extract a slice of the model image to compare to your previous textures:
http://i5.photobucket.com/albums/y171/barbyw/GC%20Calibrate/image014.jpg
If you take colour readings, then you should have a near-perfect match. Some of the values will be one or two increments out. This is likely to be because when taking the screenshots the colours are transplanted to another RGB colour space (Windows) before being pasted into photoshop's RGB colour space (Adobe RGB or sRGB). For the purposes of SC4 this really is irrelevant.
More importantly you will notice that the white strip does not match. Gmax will always offset pure white (255 255 255) to this colour cast as in the game white (255 255 255) is used as an alpha channel, and is reserved to display the LODs, i think.
You will also notice that the top of the model has a different colour cast. This is because of the lighting effects used in rendering. You may want to create a special .acv file for roof items, but be careful not to offset the textures so much that any 3D form is lost. I find that for pitched roofs the .acv file used for the side also works.
You can use your .acv file in a number of ways and even integrate it permanently into photoshop. If you use templates to create textures, you may find applying an adjustment layer will rid you of the need to ever load your .acv again. If you use photoshop Actions to output textures directly to your gmax material libraries, then the .acv can be incorporated into these scripts.
I use my .acv file as a general colour correction tool. However, it should be noted that this does not exempt you from making sensible design decisions when srutinizing your textures. There are a few other tricks which you can use to get your BATs matching the SC4 pallette which I will need to explain in another, hopefully shorter and less technical, document.
Posted by BarbyW for gascooker